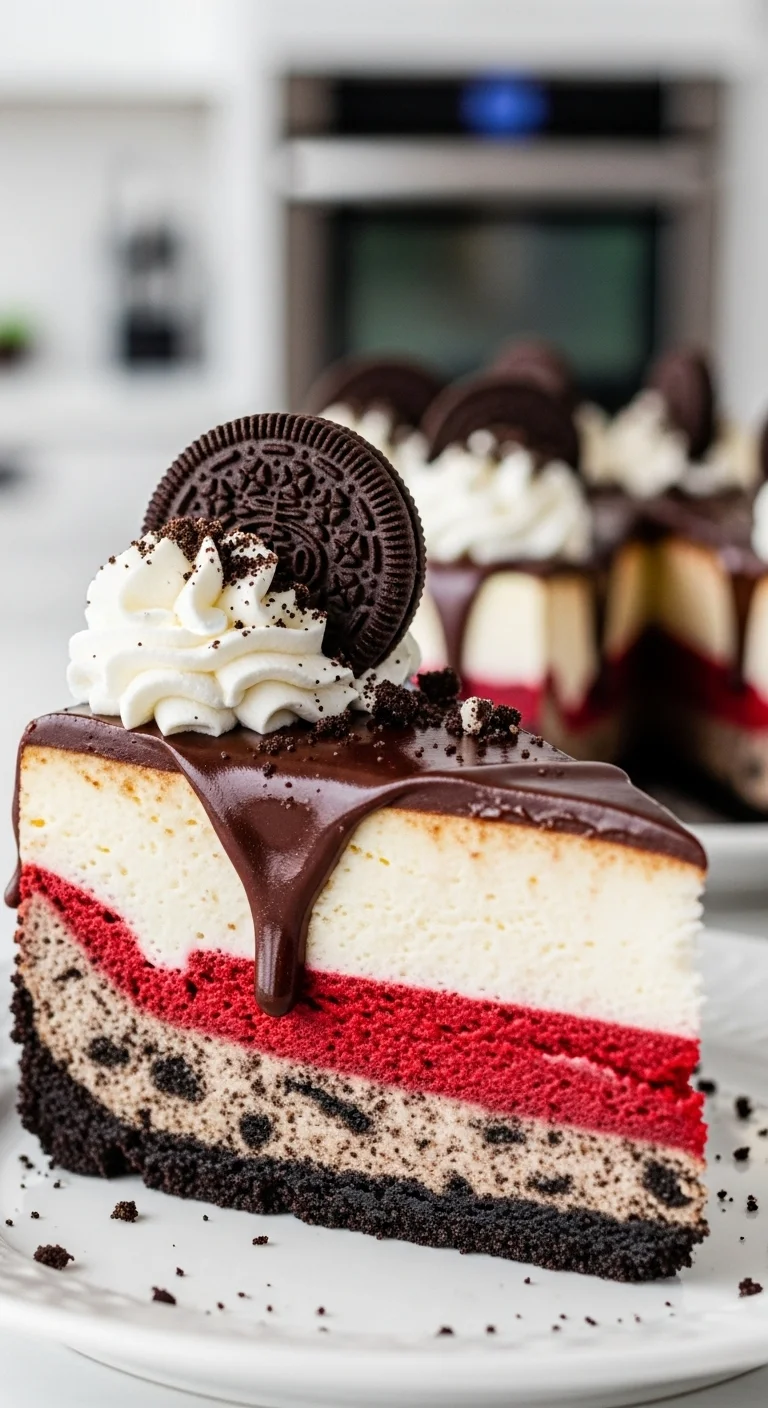
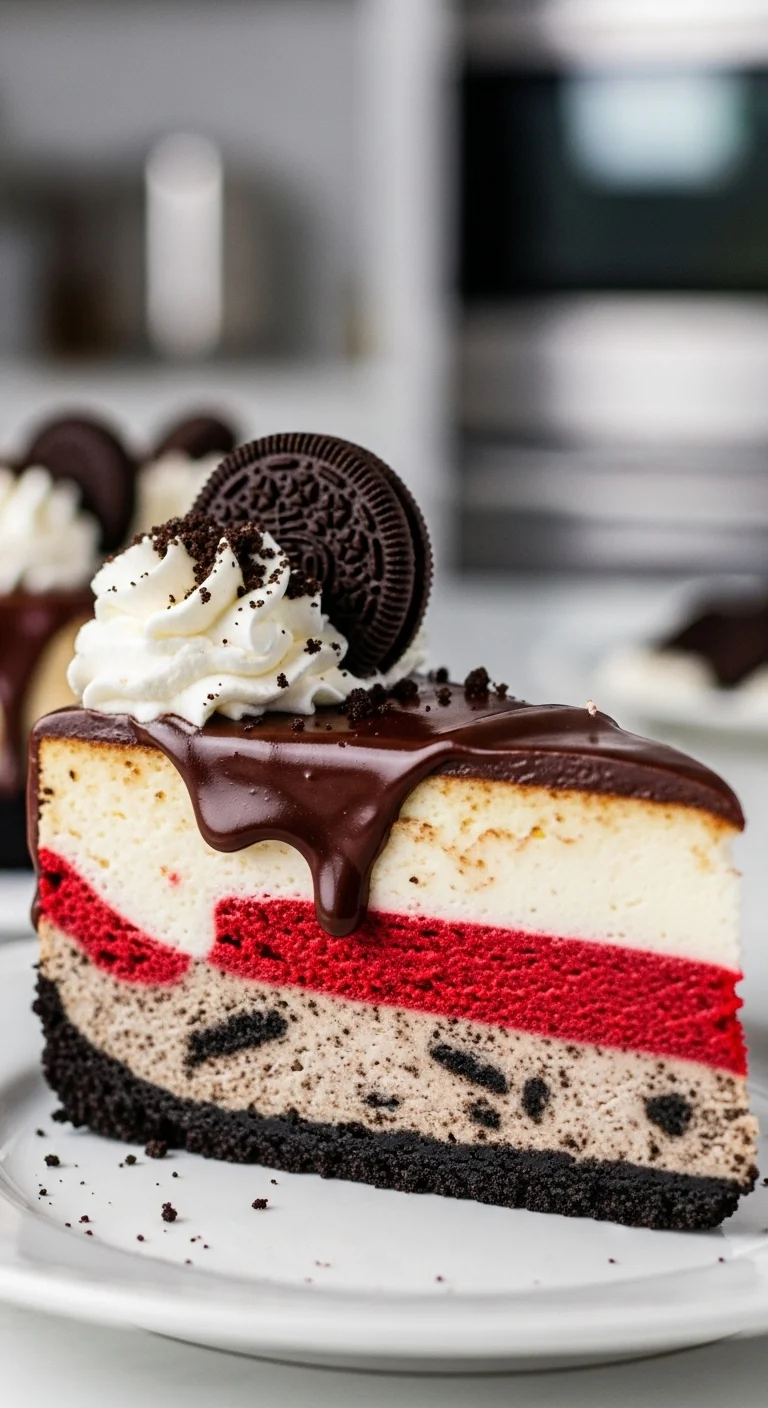
There are desserts, and then there are desserts that make you stop in your tracks, your eyes widening, a slight gasp escaping your lips. This Red Velvet Oreo Cheesecake is unequivocally the latter. Imagine the intense flavor of red velvet cake, that subtle cocoa tang mingling with the smooth tang of cream cheese, all supported by a crunchy, chocolatey Oreo crust and crowned with a glossy chocolate ganache. This isn’t just a cheesecake; it’s a symphony of textures and tastes, a decadent experience that will leave you and your guests utterly speechless. Trust me, friends, this Oreo cheesecake recipe will become a cornerstone of your special occasion baking repertoire.
Why This Oreo Cheesecake Recipe Will Change Your Life
I know, I know. “Change your life” is a pretty bold statement. But honestly, this isn’t just hyperbole. This Red Velvet Oreo Cheesecake does more than just satisfy a sweet craving; it creates memories. I first made this cheesecake for my sister’s birthday. She’s a notoriously picky eater, especially when it comes to desserts. After one bite, her eyes lit up, and she declared it the “best dessert ever.” That’s the power of this recipe. It’s a conversation starter, a mood booster, and a guaranteed crowd-pleaser. This specific Oreo cheesecake recipe stands out because it perfectly balances richness and sweetness. The slightly bitter notes of the cocoa powder in the red velvet layer cut through the sweetness of the cream cheese and Oreo crust, creating a harmonious flavor profile. Plus, the texture is incredible. The smooth, creamy cheesecake filling contrasts beautifully with the crunchy Oreo crust and the velvety ganache. Making this cheesecake is also incredibly rewarding. The process itself is therapeutic, from crushing the Oreos to watching the cheesecake bake in the oven. And the moment you take that first bite? Pure bliss. And the best part? This easy cheesecake is surprisingly simple to make. While it requires some patience (hello, chilling time!), the actual hands-on time is minimal. With a few simple steps, you can create a dessert that looks and tastes like it came from a high-end bakery. This Oreo cheesecake recipe will be a valuable addition to your cookbook. Think birthdays, anniversaries, holidays, or even just a “treat yourself” kind of day. It’s the perfect centerpiece for any celebration. Prepare to be hailed as a baking genius. This Oreo cheesecake recipe will cement your status as the go-to dessert maker in your circle.The Secret Techniques That Make This Oreo Cheesecake Recipe Perfect
What truly elevates this Red Velvet Oreo Cheesecake from good to extraordinary are a few key techniques. These aren’t difficult, but they make all the difference in achieving that perfect creamy texture and balanced flavor. First, and this is crucial: use room temperature ingredients. I cannot stress this enough. Room temperature cream cheese, eggs, and sour cream will ensure that your batter is smooth and lump-free. Cold ingredients will result in a lumpy batter, which can affect the texture of the cheesecake. Take your cream cheese out of the refrigerator at least an hour before you plan to start baking. Next, don’t overmix the batter. Overmixing incorporates too much air, which can cause the cheesecake to rise and then collapse, resulting in cracks. Mix the ingredients until just combined. Remember, a few small lumps are okay. Speaking of cracks, the dreaded cheesecake crack is the bane of many bakers. To minimize the risk of cracks, bake the cheesecake at a low temperature (325°F/163°C) and cool it slowly in the oven with the door slightly ajar. This allows the cheesecake to cool gradually, preventing it from shrinking too quickly and cracking. A water bath is another fantastic technique for preventing cracks and achieving an ultra-creamy texture. To use a water bath, wrap the bottom of your springform pan in aluminum foil to prevent water from seeping in, then place the pan in a larger roasting pan. Fill the roasting pan with hot water until it reaches about halfway up the sides of the springform pan. The water bath creates a humid environment that helps the cheesecake bake evenly and prevents it from drying out. Another crucial tip: chill the cheesecake thoroughly. Chilling the cheesecake for at least 6 hours, or preferably overnight, allows the flavors to meld together and the texture to firm up. This is essential for achieving that perfect sliceable consistency. Finally, the chocolate ganache is the perfect finishing touch. Using high-quality semi-sweet chocolate chips will give the ganache a rich, decadent flavor. Letting the ganache cool slightly before pouring it over the cheesecake will prevent it from melting the top layer of the cheesecake. All these techniques combine to make this Oreo cheesecake recipe the best it can be. You’ll want to remember them all!Red Velvet Oreo Cheesecake Recipe
Indulge in this Red Velvet Oreo Cheesecake! Rich layers, Oreo crust, and chocolate ganache. Perfect for special occasions. Get the recipe now!
🍎 Nutrition Information
🥘 Ingredients
👨🍳 Instructions
-
Preheat oven to 325°F (163°C). Grease a 9-inch springform pan and line the bottom with parchment paper.
-
In a bowl, mix 2 ½ cups of Oreo cookie crumbs (about 25-30 cookies, finely crushed, including the filling) with 5 tablespoons of melted unsalted butter.
-
Press the mixture firmly into the bottom of the springform pan. Use the bottom of a measuring cup to create an even, compact crust.
-
Bake for 8-10 minutes, then set aside to cool completely.
-
In a large bowl, beat 16 ounces (2 blocks) of softened cream cheese with ¾ cup of granulated sugar until smooth and creamy. Use an electric mixer for best results.
-
Add ¼ cup of sour cream, 2 large eggs (one at a time, mixing well after each addition), 1 ½ tablespoons of cocoa powder, 1 ½ teaspoons of vanilla extract, and 1 tablespoon of red food coloring.
-
Mix until just combined. Be careful not to overmix.
-
Pour the red velvet batter over the cooled Oreo crust and spread evenly. Use a spatula to smooth the surface.
-
In a separate bowl, repeat the process with 16 ounces (2 blocks) of softened cream cheese, ¾ cup of granulated sugar, ¼ cup of sour cream, 2 large eggs, and 1 ½ teaspoons of vanilla extract.
-
Mix until just combined.
-
Carefully pour the vanilla cheesecake batter over the red velvet layer. Gently smooth the surface with a spatula.
-
Place the cheesecake in the preheated oven and bake for 50-60 minutes. The edges should be set, but the center should still be slightly jiggly.
-
If you’re using a water bath, now is the time to add it.
-
Turn off the oven and crack the oven door open slightly. Let the cheesecake cool in the oven for 1 hour.
-
Transfer the cheesecake to the refrigerator and chill for at least 6 hours, or preferably overnight.
-
Heat ½ cup of heavy cream in a small saucepan until hot but not boiling.
-
Pour the hot cream over ¾ cup of semi-sweet chocolate chips in a bowl. Let sit for 2 minutes, then stir until smooth and glossy. A pinch of salt will enhance the chocolate flavor.
-
Let the ganache cool slightly before pouring it over the chilled cheesecake. Spread evenly with a spatula.
-
Pipe whipped cream around the edges (optional), sprinkle with Oreo crumbs, and top with whole Oreos.
-
Slice and serve chilled. Dip a sharp knife in hot water and wipe it clean before each slice for clean, professional-looking cuts.
📝 Notes & Tips
Use room temperature ingredients. Don’t overmix the batter. Bake the cheesecake at a low temperature (325°F/163°C) and cool it slowly in the oven with the door slightly ajar. Wrap the bottom of your springform pan in aluminum foil to prevent water from seeping in, then place the pan in a larger roasting pan. Fill the roasting pan with hot water until it reaches about halfway up the sides of the springform pan. Chill the cheesecake thoroughly for at least 6 hours, or preferably overnight. Let the ganache cool slightly before pouring it over the cheesecake. Store leftover cheesecake in an airtight container in the refrigerator for up to 5 days. Freeze for up to 2 months, wrapped tightly in plastic wrap and aluminum foil.
Essential Ingredients: What Makes Each One Special
Each ingredient in this Red Velvet Oreo Cheesecake plays a specific role in creating the overall flavor and texture. Let’s break down the key players:- Oreo Cookies: The star of the crust! I recommend using regular Oreos, but you can experiment with different flavors like Golden Oreos or Double Stuf Oreos. The Oreo cookie crumbs provide a deep chocolate flavor and a satisfying crunch.
- Unsalted Butter: Binds the Oreo crumbs together, creating a sturdy and flavorful crust. Make sure to use unsalted butter so you can control the amount of salt in the recipe.
- Cream Cheese: The foundation of the cheesecake! Use full-fat cream cheese for the creamiest texture. Low-fat cream cheese will work, but the cheesecake will be less rich and creamy. Philadelphia Cream Cheese is my personal favorite.
- Granulated Sugar: Sweetens the cheesecake and helps to create a smooth texture.
- Sour Cream: Adds tanginess and moisture to the cheesecake. You can substitute Greek yogurt for sour cream, but the cheesecake will be slightly tangier.
- Large Eggs: Bind the ingredients together and add richness to the cheesecake.
- Cocoa Powder: Gives the red velvet layer its characteristic chocolate flavor. Use unsweetened cocoa powder for the best results.
- Vanilla Extract: Enhances the flavor of the cheesecake and adds a touch of warmth. Use pure vanilla extract, not imitation vanilla.
- Red Food Coloring: Gives the red velvet layer its vibrant color. I recommend using gel food coloring, as it’s more concentrated and won’t thin out the batter. If you prefer not to use food coloring, you can omit it, but the red velvet layer won’t be as visually striking.
- Heavy Cream: Used to make the chocolate ganache. The heavy cream creates a smooth and glossy ganache.
- Semi-Sweet Chocolate Chips: Provide the rich chocolate flavor for the ganache. You can use milk chocolate chips or dark chocolate chips, depending on your preference.
Step-by-Step Mastery: Pro Techniques for Success
Let’s walk through the process of making this Red Velvet Oreo Cheesecake, step by step, with some pro techniques sprinkled throughout:- Prepare the Oreo Crust: Preheat your oven to 325°F (163°C). This lower temperature is key for even baking. Grease a 9-inch springform pan and line the bottom with parchment paper. This ensures easy removal of the cheesecake. In a bowl, mix 2 ½ cups of Oreo cookie crumbs (about 25-30 cookies, finely crushed, including the filling) with 5 tablespoons of melted unsalted butter. Press the mixture firmly into the bottom of the springform pan. Use the bottom of a measuring cup to create an even, compact crust. Bake for 8-10 minutes, then set aside to cool completely. This pre-baking helps to set the crust and prevent it from becoming soggy.
- Make the Red Velvet Cheesecake Layer: In a large bowl, beat 16 ounces (2 blocks) of softened cream cheese with ¾ cup of granulated sugar until smooth and creamy. Use an electric mixer for best results. Add ¼ cup of sour cream, 2 large eggs (one at a time, mixing well after each addition), 1 ½ tablespoons of cocoa powder, 1 ½ teaspoons of vanilla extract, and 1 tablespoon of red food coloring. Mix until just combined. Be careful not to overmix.
- Pour the Red Velvet Layer: Pour the red velvet batter over the cooled Oreo crust and spread evenly. Use a spatula to smooth the surface.
- Make the Vanilla Cheesecake Layer: In a separate bowl, repeat the process with 16 ounces (2 blocks) of softened cream cheese, ¾ cup of granulated sugar, ¼ cup of sour cream, 2 large eggs, and 1 ½ teaspoons of vanilla extract. Mix until just combined.
- Layer the Cheesecake: Carefully pour the vanilla cheesecake batter over the red velvet layer. Gently smooth the surface with a spatula. This layering effect adds visual appeal and flavor complexity.
- Bake the Cheesecake: Place the cheesecake in the preheated oven and bake for 50-60 minutes. The edges should be set, but the center should still be slightly jiggly. If you’re using a water bath, now is the time to add it.
- Cool the Cheesecake: Turn off the oven and crack the oven door open slightly. Let the cheesecake cool in the oven for 1 hour. This slow cooling process helps to prevent cracks.
- Chill the Cheesecake: Transfer the cheesecake to the refrigerator and chill for at least 6 hours, or preferably overnight. Patience is key!
- Make the Chocolate Ganache: Heat ½ cup of heavy cream in a small saucepan until hot but not boiling. Pour the hot cream over ¾ cup of semi-sweet chocolate chips in a bowl. Let sit for 2 minutes, then stir until smooth and glossy. A pinch of salt will enhance the chocolate flavor.
- Glaze the Cheesecake: Let the ganache cool slightly before pouring it over the chilled cheesecake. Spread evenly with a spatula.
- Garnish and Serve: Pipe whipped cream around the edges (optional), sprinkle with Oreo crumbs, and top with whole Oreos. Slice and serve chilled. Dip a sharp knife in hot water and wipe it clean before each slice for clean, professional-looking cuts.
Creative Variations: Make It Your Own
One of the best things about baking is the opportunity to get creative and put your own spin on a recipe. Here are a few variations to try with this Red Velvet Oreo Cheesecake:- Oreo Flavor Variations: Experiment with different Oreo flavors in the crust. Golden Oreos, Mint Oreos, or Peanut Butter Oreos would all be delicious options.
- Red Velvet Extract: To amp up the red velvet flavor, add a teaspoon of red velvet extract to the red velvet cheesecake layer.
- Chocolate Chunks: Fold chocolate chunks into either the red velvet or vanilla cheesecake layer for added texture and chocolate flavor.
- Peppermint Twist: For a festive holiday version, add peppermint extract to the vanilla cheesecake layer and top with crushed peppermint candies.
- White Chocolate Ganache: Instead of semi-sweet chocolate chips, use white chocolate chips to make a white chocolate ganache. This would be a beautiful contrast to the red velvet layer.
- Salted Caramel Drizzle: Drizzle salted caramel sauce over the chocolate ganache for a salty-sweet flavor combination.
- Berry Topping: Top the cheesecake with fresh berries, such as raspberries or strawberries, for a lighter, fruitier option.
- Red Velvet Crumble Topping: Make a simple red velvet crumble topping with flour, butter, sugar, and cocoa powder, and sprinkle it over the cheesecake before baking.
Perfect Pairings: What to Serve With Oreo Cheesecake Recipe
While this Red Velvet Oreo Cheesecake is delicious on its own, pairing it with the right beverages and accompaniments can elevate the experience even further. Here are a few suggestions:- Coffee: A strong cup of coffee is a classic pairing for cheesecake. The bitterness of the coffee cuts through the richness of the cheesecake, creating a balanced flavor combination.
- Espresso Martini: If you’re looking for something a little more indulgent, an espresso martini is the perfect pairing. The coffee and vodka in the martini complement the chocolate and cream cheese in the cheesecake.
- Red Wine: A light-bodied red wine, such as Pinot Noir, can also pair well with red velvet cheesecake. The fruitiness of the wine complements the chocolate and red velvet flavors.
- Milk: A glass of cold milk is a simple but satisfying pairing. The milk helps to cleanse the palate and balance the richness of the cheesecake.
- Whipped Cream: A dollop of freshly whipped cream is a classic topping for cheesecake. The light and airy whipped cream complements the creamy texture of the cheesecake.
- Fresh Berries: As mentioned earlier, fresh berries are a great way to add a touch of freshness and acidity to the cheesecake.
- Vanilla Ice Cream: A scoop of vanilla ice cream is another classic pairing for cheesecake. The vanilla flavor complements the cream cheese and chocolate flavors.
Storage Secrets: Keep It Fresh and Delicious
Proper storage is essential for keeping your Red Velvet Oreo Cheesecake fresh and delicious. Here are a few tips:- Refrigeration: Store leftover cheesecake in an airtight container in the refrigerator for up to 5 days. Make sure the container is tightly sealed to prevent the cheesecake from drying out.
- Freezing: You can also freeze the cheesecake for up to 2 months. To freeze, wrap the cheesecake tightly in plastic wrap, then wrap it again in aluminum foil. This will help to prevent freezer burn. Thaw the cheesecake in the refrigerator overnight before serving.
- Individual Slices: For easy serving, you can freeze individual slices of cheesecake. Wrap each slice tightly in plastic wrap and store them in a freezer-safe container.
- Ganache Stability: The chocolate ganache will harden in the refrigerator, but it will soften up at room temperature. If you prefer a softer ganache, let the cheesecake sit at room temperature for about 30 minutes before serving.
- Preventing Condensation: When thawing the cheesecake in the refrigerator, condensation may form on the surface. To prevent this, place a paper towel on top of the cheesecake to absorb the moisture.
Health Benefits: Why This Oreo Cheesecake Recipe is Good for You
Okay, let’s be honest: Red Velvet Oreo Cheesecake isn’t exactly a health food. It’s a decadent dessert meant to be enjoyed in moderation. However, that doesn’t mean it’s devoid of any nutritional value. Here are a few potential health benefits:- Calcium: Cream cheese and sour cream are good sources of calcium, which is essential for strong bones and teeth.
- Protein: Eggs and dairy products provide protein, which is important for building and repairing tissues.
- Antioxidants: Cocoa powder contains antioxidants, which can help protect your body against damage from free radicals.
- Mood Booster: Let’s not underestimate the power of a delicious dessert to boost your mood! Indulging in a treat like this Red Velvet Oreo Cheesecake can provide a sense of pleasure and satisfaction.
- Social Connection: Sharing this cheesecake with friends and family can foster social connection and create positive memories.
Troubleshooting: Fix Common Mistakes
Even the most experienced bakers can encounter occasional hiccups when making cheesecake. Here are a few common problems and how to fix them:- Cracked Cheesecake: As mentioned earlier, cracked cheesecake is a common problem. To prevent cracks, bake the cheesecake at a low temperature, cool it slowly in the oven with the door ajar, and consider using a water bath. If your cheesecake does crack, don’t worry! You can cover the cracks with chocolate ganache or whipped cream.
- Soggy Crust: To prevent a soggy crust, pre-bake the Oreo crust for 8-10 minutes before adding the cheesecake filling. This will help to set the crust and prevent it from absorbing too much moisture.
- Lumpy Batter: Lumpy batter is usually caused by using cold cream cheese or overmixing the batter. Make sure your cream cheese is at room temperature before mixing, and mix the batter until just combined.
- Cheesecake Sinking: If your cheesecake sinks in the middle after baking, it may be due to overmixing the batter or baking the cheesecake at too high of a temperature. Be careful not to overmix the batter, and bake the cheesecake at the recommended temperature.
- Ganache Too Thick: If your chocolate ganache is too thick, add a tablespoon or two of hot heavy cream until it reaches the desired consistency.
- Ganache Too Thin: If your chocolate ganache is too thin, let it sit at room temperature for a few minutes to thicken up. You can also add a small amount of melted chocolate to thicken it.
Expert Answers: Your Burning Questions
I’ve received countless questions about making cheesecake over the years. Here are some of the most frequently asked questions about this Red Velvet Oreo Cheesecake:- Can I use low-fat cream cheese? While you can use low-fat cream cheese, the cheesecake will be less rich and creamy. Full-fat cream cheese is highly recommended for the best results.
- Can I use a different type of cookie for the crust? Absolutely! Chocolate graham crackers, shortbread cookies, or even Nilla Wafers would all work well.
- Can I make this cheesecake gluten-free? Yes! Simply use gluten-free Oreo cookies or another gluten-free cookie for the crust.
- Can I make this cheesecake ahead of time? Yes! In fact, it’s recommended to make the cheesecake at least a day in advance to allow the flavors to meld together and the texture to firm up.
- How long does this cheesecake last? This cheesecake will last for up to 5 days in the refrigerator or up to 2 months in the freezer.
- Do I need a water bath? A water bath is not absolutely necessary, but it will help to prevent cracks and create an ultra-creamy texture. If you choose not to use a water bath, make sure to bake the cheesecake at a low temperature and cool it slowly in the oven.
- My cheesecake is browning too quickly. What should I do? If your cheesecake is browning too quickly, tent it with aluminum foil to prevent it from burning.
More Amazing Recipes You’ll Love
If you enjoyed this Red Velvet Oreo Cheesecake, here are a few other recipes from RecipesWithClara you might also enjoy:- The Ultimate Classic New York Cheesecake Recipe – For cheesecake purists, this recipe is a must-try! Rich, creamy, and utterly irresistible.
- Decadent Molten Chocolate Lava Cakes for Two – Indulge in these warm, gooey chocolate cakes with a molten center. Perfect for a romantic dessert.
- Grandma Clara’s Famous Lemon Meringue Pie – A tangy and sweet classic with a fluffy meringue topping.
- Warm and Cozy Apple Crumble with Oat Topping – A comforting and easy dessert that’s perfect for fall.
- The Best Ever Chocolate Chip Cookies (Secret Ingredient!) – Chewy, chocolatey, and perfect for any occasion. The secret ingredient will surprise you!
- Rich and Fudgy Peanut Butter Swirl Brownies – A delightful combination of chocolate and peanut butter.